시큐리티
: 허가된 사용자만이 접근할 수 있도록 제한하는 보안 기능
- 인증(authentication)
이름과 암호 확인
ex) 로그인
- 인가(권한)(authorization)
사용자가 해당 페이지에 접근할 수 있는지 확인
ex) 로그인 기반
- 시큐리티 처리 방법
| 시큐리티 처리 방법 | 설명 |
| 선언적 시큐리티 | 코드 작성 x, web.xml 파일에 보안 구성 작성 -> 사용자의 인증 수행 |
| 프로그래밍적 시큐리티 | request 내장 객체의 메소드를 통해 사용자의 권한 부여를 처리 |
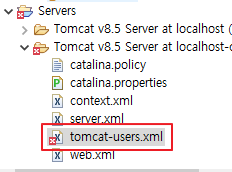
웹 서버에 역할과 사용자 구성하기


여러가지의 역할을 매핑할 수 있음
  <role rolename="tomcat"/> <!-- 교수 -->
  <role rolename="role1"/> <!-- 학생 -->
  <role rolename="manager" /> <!-- 관리자 -->
  <user username="tomcat" password="java" roles="tomcat"/>
  <user username="both" password="java" roles="tomcat,role1"/>
  <user username="role1" password="java" roles="role1"/>
  <user username="admin" password="java" roles="tomcat,role1,manager"/>
선언적 시큐리티 처리
: web.xml 파일에 보안 구성을 작성하여 수행하는 방식
1. 시큐리티 역할 설정하기 (<security-role>)
web.xml 파일에 추가
+<security-role> 양식
  <security-role>
  	<description></description>
  	<role-name>manager</role-name> <!-- 사용시 톰캣에 존재해야함 -->
  </security-role>
2. 시큐리티 제약 사항 설정 (<security- constraint>)
웹 자원의 이름 설정
웹 자원에 대한 약속 목록 (프로젝트명, HTTP 요청방식 등)
- security-constraint의 하위 요소
| 요소 | 설명 |
| <web-resource-collection> | 웹 자원에 대한 접근 설정 |
| <auth-constraint> | 접근할 수 있는 인증된 사용자 설정 |
| <user-data-constraint> | 데이터 전송 시 데이터 보호 설정 |
- web-resource-collection의 하위 요소
| 요소 | 설명 |
| <web-resource-name> | 웹 자원의 이름 설정, 생략 가능 |
| <url-pattern> | 접근 제한을 요청할 URL 목록 설정, 제한 하지 않는 경우 생략 가능 |
| <http-method> <http-method-omission> |
http 메소드를 설정 GET 또는 POST |
+양식
  <security-constraint>
  	<!-- 웹 자원의 이름 설정(생략가능) -->
  	<display-name>JSPBook Security</display-name>
  	<!-- 웹 자원에 대한 약속 목록 -->
  	<web-resource-collection>
  		<!-- 프로젝트명 -->
  		<web-resource-name>JSPBook</web-resource-name>
  		<!-- 접근제한을 할 대상 /ch10/* => ch10폴더 하위의 모든 jsp 페이지 접근 시 접근제한 -->
<!--         <url-pattern>/ch10/security01.jsp</url-pattern> -->
		<!-- 접근 제한 요청 경로 설정
		접근 제한을 요청할 URL 목록 설정
		자원에 대한 접근을 제한하지 않는 경우 생략 가능
		 -->
  		<url-pattern>/addProduct.jsp</url-pattern>
  		<!-- HTTP 요청방식 -->
  		<http-method>GET</http-method>
  	</web-resource-collection>
  </security-constraint>
3. security-constraint의 하위 auth-constraint 요소 (<auth-constraint>)
권한이 부여된 사용자만이 웹 자원에 접근할 수 있도록 이름 설정
- auth-constraint 의 하위요소
| 요소 | 설명 |
| <description> | 권한 부여 제약 사항에 대한 설명 기술 |
| <role-name> | 권한 부여된 사용자 이름을 대소문자 구분하여 설정 tomat-users.xml에 등록된 역할과 사용자여야 함 모든 사용자에게 부여시 *로 표시 |
+ 양식
	<!-- 권한이 부여된 사용자만이 웹 자원에 접근할 수 있도록 이름을 설정하는 요소
	web-resource-collection 요소의 url-pattern과
	http-method에 설정된 경로에 접근할 수 있는 권한이 부여된
	사용자의 이름을 지정함
	auth-constraint 요소를 생략하면 웹 서버는 사용자
	인증을 요구하지 않고 사용자의 요청을 승인함
	 -->
  	<auth-constraint>
		<!-- 권한 부여 제약 사항에 대한 설명 기술 -->
		<description></description>
		<!-- 권한이 부여된 사용자 이름 설정
		role1 권한을 가진 role1, both 사용자의 경우
		아이디와 비밀번호가 맞게 입력되었다면 security01.jsp로 접근 가능
		반드시 tomcat-users.xml에 등록된 역할과 사용자여야 함
		만약 모든 사용자에게 권한을 부여하려면 *로표시함
		-->
        <role-name>manager</role-name>
  	</auth-constraint>
- web.xml 파일
<?xml version="1.0" encoding="UTF-8"?>
<web-app xmlns:xsi="http://www.w3.org/2001/XMLSchema-instance" xmlns="http://xmlns.jcp.org/xml/ns/javaee" xsi:schemaLocation="http://xmlns.jcp.org/xml/ns/javaee http://xmlns.jcp.org/xml/ns/javaee/web-app_3_1.xsd" id="WebApp_ID" version="3.1">
<display-name>JSPBook</display-name>
<welcome-file-list>
<welcome-file>index.html</welcome-file>
<welcome-file>index.htm</welcome-file>
<welcome-file>index.jsp</welcome-file>
<welcome-file>default.html</welcome-file>
<welcome-file>default.htm</welcome-file>
<welcome-file>default.jsp</welcome-file>
</welcome-file-list>
<!-- 시큐리티 역할(Role) 설정 -->
<security-role>
<description></description>
<role-name>manager</role-name> <!-- 사용시 톰캣에 존재해야함 -->
</security-role>
<!-- 2. 시큐리티 제약 사항 설정 -->
<security-constraint>
<!-- 웹 자원의 이름 설정(생략가능) -->
<display-name>JSPBook Security</display-name>
<!-- 웹 자원에 대한 약속 목록 -->
<web-resource-collection>
<!-- 프로젝트명 -->
<web-resource-name>JSPBook</web-resource-name>
<!-- 접근제한을 할 대상 /ch10/* => ch10폴더 하위의 모든 jsp 페이지 접근 시 접근제한 -->
<!-- <url-pattern>/ch10/security01.jsp</url-pattern> -->
<!-- 접근 제한 요청 경로 설정
접근 제한을 요청할 URL 목록 설정
자원에 대한 접근을 제한하지 않는 경우 생략 가능
-->
<url-pattern>/addProduct.jsp</url-pattern>
<!-- HTTP 요청방식 -->
<http-method>GET</http-method>
</web-resource-collection>
<!-- 권한이 부여된 사용자만이 웹 자원에 접근할 수 있도록
이름을 설정하는 요소
web-resource-collection 요소의 url-pattern과
http-method에 설정된 경로에 접근할 수 있는 권한이 부여된
사용자의 이름을 지정함
auth-constraint 요소를 생략하면 웹 서버는 사용자
인증을 요구하지 않고 사용자의 요청을 승인함
-->
<auth-constraint>
<!-- 권한 부여 제약 사항에 대한 설명 기술 -->
<description></description>
<!-- 권한이 부여된 사용자 이름 설정
role1 권한을 가진 role1, both 사용자의 경우
아이디와 비밀번호가 맞게 입력되었다면 security01.jsp로 접근 가능
반드시 tomcat-users.xml에 등록된 역할과 사용자여야 함
만약 모든 사용자에게 권한을 부여하려면 *로표시함
-->
<role-name>manager</role-name>
</auth-constraint>
</security-constraint>
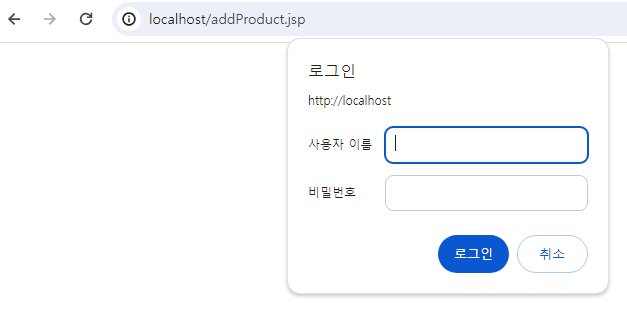
<!-- 그러면, 로그인 페이지는? -->
<login-config>
<!-- 로그인 페이지는 기본으로 제공됨 -->
<auth-method>BASIC</auth-method>
</login-config>
</web-app>
4. form-login-config 요소 설정
- form-login-config의 하위 요소
| 요소 | 설명 |
| <form-login-page> | 로그인 페이지 설정 |
| <form-error-page> | 인증 실패 시 표시할 오류 페이지 설정 |
+양식
	<!-- FORM 인증 처리 기법 설정 -->
	<auth-method>FORM</auth-method>
	<!-- 인증 처리를 위한 로그인 및 오류 페이지 설정 -->
	<form-login-config>
		<!-- 인증(로그인) 처리를 위한 로그인 페이지 설정 -->
		<form-login-page>/login.jsp</form-login-page>
		<!-- 인증(로그인) 실패시 오류페이지 설정-->
		<form-error-page>/login_failed.jsp</form-error-page>
	</form-login-config>
로그인 페이지 추가
=> 위의 방식대로 web.xml에 기입해야 진행이 가능함
web.xml
<?xml version="1.0" encoding="UTF-8"?>
<web-app xmlns:xsi="http://www.w3.org/2001/XMLSchema-instance" xmlns="http://xmlns.jcp.org/xml/ns/javaee" xsi:schemaLocation="http://xmlns.jcp.org/xml/ns/javaee http://xmlns.jcp.org/xml/ns/javaee/web-app_3_1.xsd" id="WebApp_ID" version="3.1">
  <display-name>JSPBook</display-name>
  <welcome-file-list>
    <welcome-file>index.html</welcome-file>
    <welcome-file>index.htm</welcome-file>
    <welcome-file>index.jsp</welcome-file>
    <welcome-file>default.html</welcome-file>
    <welcome-file>default.htm</welcome-file>
    <welcome-file>default.jsp</welcome-file>
  </welcome-file-list>
  <!-- 시큐리티 역할(Role) 설정 -->
  <security-role>
  	<description></description>
  	<role-name>manager</role-name> <!-- 사용시 톰캣에 존재해야함 -->
  </security-role>

  <!-- 2. 시큐리티 제약 사항 설정 -->
  <security-constraint>
  	<!-- 웹 자원의 이름 설정(생략가능) -->
  	<display-name>JSPBook Security</display-name>
  	<!-- 웹 자원에 대한 약속 목록 -->
  	<web-resource-collection>
  		<!-- 프로젝트명 -->
  		<web-resource-name>JSPBook</web-resource-name>
  		<!-- 접근제한을 할 대상 /ch10/* => ch10폴더 하위의 모든 jsp 페이지 접근 시 접근제한 -->
<!--         <url-pattern>/ch10/security01.jsp</url-pattern> -->
		<!-- 접근 제한 요청 경로 설정
		접근 제한을 요청할 URL 목록 설정
		자원에 대한 접근을 제한하지 않는 경우 생략 가능
		 -->
  		<url-pattern>/addProduct.jsp</url-pattern>
  		<!-- HTTP 요청방식 -->
  		<http-method>GET</http-method>
  	</web-resource-collection>

	<!-- 권한이 부여된 사용자만이 웹 자원에 접근할 수 있도록
	이름을 설정하는 요소
	web-resource-collection 요소의 url-pattern과
	http-method에 설정된 경로에 접근할 수 있는 권한이 부여된
	사용자의 이름을 지정함
	auth-constraint 요소를 생략하면 웹 서버는 사용자
	인증을 요구하지 않고 사용자의 요청을 승인함
	 -->
  	<auth-constraint>
		<!-- 권한 부여 제약 사항에 대한 설명 기술 -->
		<description></description>
		<!-- 권한이 부여된 사용자 이름 설정
		role1 권한을 가진 role1, both 사용자의 경우
		아이디와 비밀번호가 맞게 입력되었다면 security01.jsp로 접근 가능
		반드시 tomcat-users.xml에 등록된 역할과 사용자여야 함
		만약 모든 사용자에게 권한을 부여하려면 *로표시함
		-->
        <role-name>manager</role-name>
  	</auth-constraint>
  </security-constraint>
  <!-- 그러면, 로그인 페이지는? -->
  <login-config>
  	<!-- 로그인 페이지는 기본으로 제공됨 -->
<!--   	<auth-method>BASIC</auth-method> -->

	<!-- FORM 인증 처리 기법 설정 -->
	<auth-method>FORM</auth-method>
	<!-- 인증 처리를 위한 로그인 및 오류 페이지 설정 -->
	<form-login-config>
		<!-- 인증(로그인) 처리를 위한 로그인 페이지 설정 -->
		<form-login-page>/login.jsp</form-login-page>
		<!-- 인증(로그인) 실패시 오류페이지 설정-->
		<form-error-page>/login_failed.jsp</form-error-page>
	</form-login-config>
  </login-config>
</web-app>
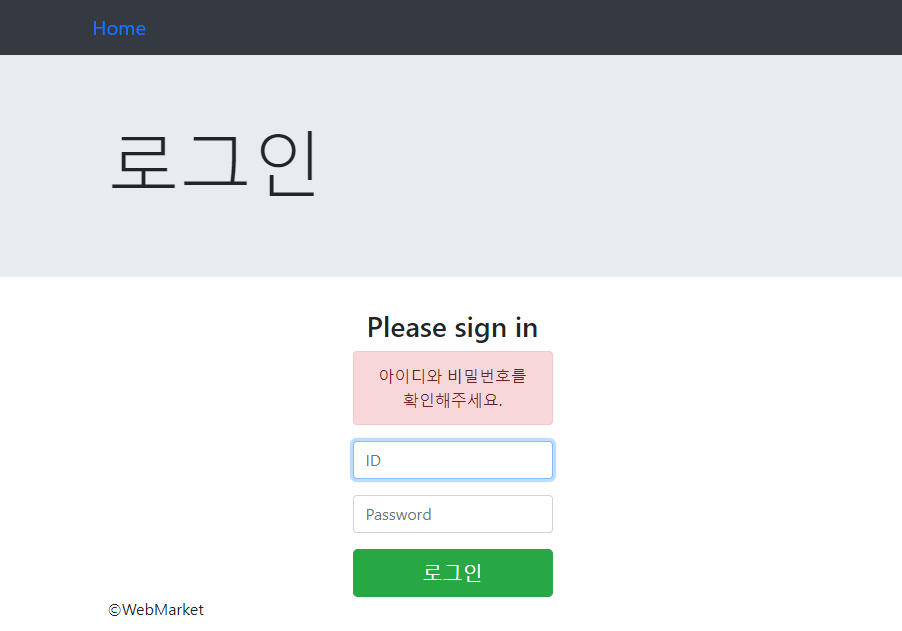
login.jsp
<%@ page language="java" contentType="text/html; charset=UTF-8"%>
<%@ page import="java.util.Date"%>
<!DOCTYPE html>
<html>
<head>
<link rel="stylesheet"
href="https://maxcdn.bootstrapcdn.com/bootstrap/4.0.0/css/bootstrap.min.css">
<title>Welcome</title>
</head>
<body>
<!-- 머리글에 해당하는 menu.jsp 파일의 내용이 포함되도록 include 디렉티브 태그를 작성 -->
<%@ include file="menu.jsp" %>
<div class="jumbotron">
<div class="container">
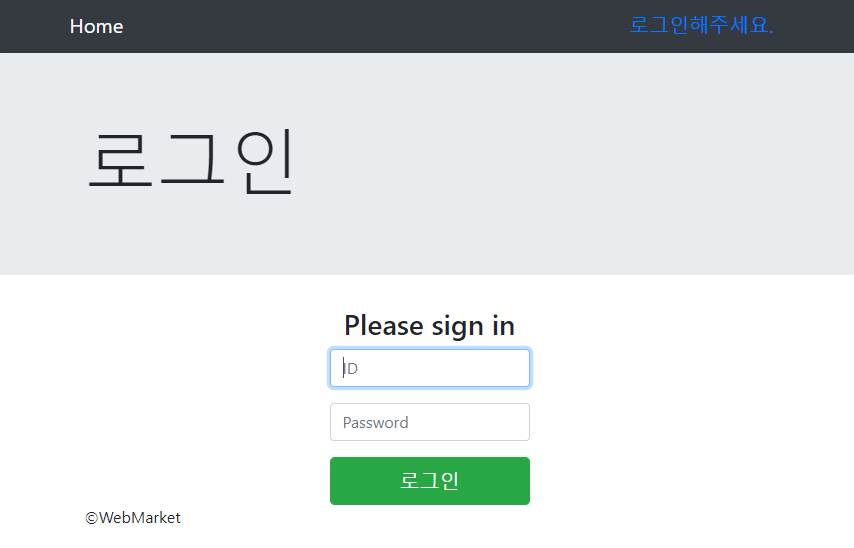
<h1 class="display-3">로그인</h1>
</div>
</div>
<div class="container" align="center">
<!-- 로그인 폼 시작 -->
<div class="col-md-4 col-md-offset-4">
<h3 class="form-signin-heading">Please sign in</h3>
<!-- 폼 기반 로그인 인증 처리를 위한 form 태그(페이지) 작성 -->
<form class="form-signin" action="j_security_check" method="post">
<!-- 아이디 입력 영역, j_username은 고정됨 -->
<div class="form-group">
<label for="inputUsername" class="sr-only">User Name</label>
<input type="text" class="form-control" placeholder="ID"
id="inputUsername" name="j_username" required autofocus>
</div>
<!-- 비밀번호 입력 영역, j_password은 고정 -->
<div class="form-group">
<label for="inputPassword" class="sr-only">Password</label>
<input type="password" class="form-control" placeholder="Password"
id="inputPassword" name="j_password" required>
</div>
<!-- submit 버튼 영역
button type="button/submit/reset"
-->
<button type="submit" class="btn btn-lg btn-success btn-block">로그인</button>
</form>
</div>
<!-- 로그인 폼 끝 -->
</div>
<%@ include file="footer.jsp" %>
</body>
</html>

로그인 실패 페이지
=> 파라미터에 error=1이 있을 시 에러 알람 출력되게 개발
login_failed.jsp
<%@ page language="java" contentType="text/html; charset=UTF-8"%>
<!-- 로그인 실패 시 실행
로그인 실패
1. 사용자 로그인 실패(인증 실패)
 -> login.jsp로 강제 페이지 이동
2. 로그인은 되지만 권한 없음(인가 실패)
 -> 403오류 발생
-->
<%
	//스크립틀릿
	//login.jsp->request.getParameter("error");오류 전달
	//로그인 인증 실해 시 해당 페이지로 강제 이동
	response.sendRedirect("/login.jsp?error=1");
%>
login.jsp
<%@ page language="java" contentType="text/html; charset=UTF-8"%>
<%@ page import="java.util.Date"%>
<!DOCTYPE html>
<html>
<head>
<link rel="stylesheet"
   href="https://maxcdn.bootstrapcdn.com/bootstrap/4.0.0/css/bootstrap.min.css">
<title>Welcome</title>
</head>
<body>
	<!-- 머리글에 해당하는 menu.jsp 파일의 내용이 포함되도록 include 디렉티브 태그를 작성 -->
	<%@ include file="menu.jsp" %>

	<div class="jumbotron">
		<div class="container">
			<h1 class="display-3">로그인</h1>
		</div>
	</div>

	<div class="container" align="center">
		<!-- 로그인 폼 시작 -->
		<div class="col-md-4 col-md-offset-4">
			<h3 class="form-signin-heading">Please sign in</h3>
			<%
				// /login.jsp?error=1
				// 로그인 인증 실패 시 요청 파라미터의 값을 얻어옴
				String error = request.getParameter("error"); // 1
				if(error != null) {
					// 오류 메시지 출력
					out.print("<div class='alert alert-danger'>");
					out.print("아이디와 비밀번호를 확인해주세요.");
					out.print("</div>");
				}
			%>
			<!-- 폼 기반 로그인 인증 처리를 위한 form 태그(페이지) 작성 -->
			<form class="form-signin" action="j_security_check" method="post">
				<!-- 아이디 입력 영역, j_username은 고정됨 -->
				<div class="form-group">
					<label for="inputUsername" class="sr-only">User Name</label>
					<input type="text" class="form-control" placeholder="ID"
						id="inputUsername" name="j_username" required autofocus>
				</div>
				<!-- 비밀번호 입력 영역, j_password은 고정 -->
				<div class="form-group">
					<label for="inputPassword" class="sr-only">Password</label>
					<input type="password" class="form-control" placeholder="Password"
						id="inputPassword" name="j_password" required>
				</div>
				<!-- submit 버튼 영역
				button type="button/submit/reset"
				-->
				<button type="submit" class="btn btn-lg btn-success btn-block">로그인</button>
			</form>
		</div>
		<!-- 로그인 폼 끝 -->
	</div>

	<%@ include file="footer.jsp" %>
</body>
</html>
프로그래밍적 시큐리티
: 보안을 위해 코드를 작성하여 권한 부여를 처리하는 방식
request 내장 객체의 메소드를 이용
- request 내장 객체의 메소드
| 메소드 | 형식 | 설명 |
| getRemoteuser() | String | 사용자의 인증 상태 반환 |
| getAuthType() | String | 서블릿 보호에 사용된 인증 방식의 이름 반환 |
| isUserInRole(java.lang.String role) | boolean | 인증된 사용자에게 설정된 역할이 있는지 확인 설정된 경우 true, 아닌 경우 false |
| getProtocol() | String | 웹 브라우저의 요청 프로토콜 확인 |
| isSecure() | boolean | https 요청으로 request가 들어왔는지 확인 맞으면 true, http로 접근 시 false |
| getUserPrinciple() | Principle | 인증한 사용자의 이름을 포함하여 java.security.Principle 객체 반환 |
addProduct.jsp
<%@ page language="java" contentType="text/html; charset=UTF-8"%>
<!DOCTYPE html>
<html>
<head>
<link rel="stylesheet" href="/css/bootstrap.min.css" />
<title></title>
<script type="text/javascript" src="/js/jquery.min.js"></script>
<script type="text/javascript">
// 동일 jsp 내에 1개의 달러function
// document 내의 모든 요소들이 로딩된 후에 실행
$(function(){
console.log("개똥이");
// object를 선택(<input type="file" ..)
$("#productImage").on("change", handleImg);
// e : onchange 이벤트
function handleImg(e) {
console.log("파일 선택 이벤트");
//e.target : <input type="file" id="productImage" name="productImage" class="form-control"...
let files = e.target.files; // 파일들
// fileArr = [a.jpg, b.jpg, c.jpg]
let fileArr = Array.prototype.slice.call(files);
// f : 파일(a.jpg)
fileArr.forEach(function(f) {
// 이미지 체킹 (MIME타입)
if(!f.type.match("image.*")) {
alert("이미지만 가능합니다.");
return; // handleImg함수 자체를 종료
}
// 이미지가 맞다면
let reader = new FileReader();
//e : reader가 이미지 객체를 읽는 이벤트
reader.onload = function(e) {
let img_html = "<img src='" + e.target.result + "' style='width:100%' />";
// <p id="pImg"><img src='oewrpasdofiasdo..' ../></p>
// 요소.append : 누적, 요소.html : 새로고침 , 요소.innerHTML : Javascript에서 새로고침
$("#pImg").append(img_html);
}
reader.readAsDataURL(f);
});
}
});
function CheckAddProduct() {
console.log("개또잉");
//상품 아이디 체크.
//1) 첫글자는 P. 2) 숫자를 조합하여 5~12자까지 입력 가능
//i) P1234 => if(!true) => if(false) => if문을 건너뜀
//ii) S1234 => if(!false) => if(true) => if문을 수행
let regExpProductId = /^P[0-9]{4,11}$/;
let productId = document.newProduct.productId.value;
console.log("productId : " + productId);
if(!regExpProductId.test(productId)) {
alert("[상품 코드]\nP와 숫자를 조합하여 5~12자까지 입력해주세요");
return;
}
// 상품명 체크
// 4 ~ 12자까지 입력 가능
// ex) 삼성갤럭시S22
let regExpPname = /[a-zA-Zㄱ-ㅎㅏ-ㅣ가-힣0-9]{4,12}/;
let pname = document.newProduct.pname.value;
console.log("pname : " + pname);
if(pname.length<4||pname.length>12) {
alert("[상품명]\n최소 4자에서 최대 12자까지만 입력해주세요");
document.newProduct.pname.select();
document.newProduct.pname.focus();
return;
}
// 상품 가격 체크
// 숫자만 입력 가능
let unitPrice = document.newProduct.unitPrice.value;
console.log("unitPrice : " + unitPrice);
if(unitPrice == 0 || isNaN(unitPrice)) {
alert("[가격]\n숫자만 입력해주세요");
document.newProduct.unitPrice.select();
document.newProduct.unitPrice.focus();
return;
}
// -12000 막아보자
if(unitPrice < 0) {
alert("[가격]\n음수는 입력할 수 없습니다.");
document.newProduct.unitPrice.select();
document.newProduct.unitPrice.focus();
return;
}
// 소수점 2자리까지만 허용
// i) 120000.35 (O)
// ii) 120000.2234242 (X)
// 역슬러시d : 숫자
// + : 1이상, * : 0이상
// ? : 있어도 되고, 없어도 됨
// 숫자로 시작하는데(숫자가 한 자리 이상 반복) 소수점이 있어도 되고, 없어도 된다. 소수 첫째자리나 둘째자리가 있어도 되고 없어도 된다. ?
let regExpUnitPrice = /^\d+(?:[.]?[\d]?[\d])?$/;
if(!regExpUnitPrice.test(unitPrice)) {
alert("[가격]\n소수점 둘째 자리까지만 입력해주세요.")
document.newProduct.unitPrice.select();
document.newProduct.unitPrice.focus();
return;
}
let unitsInStock = document.newProduct.unitsInStock.value;
console.log("unitsInStock : " + unitsInStock);
if(unitsInStock.length == 0 || isNaN(unitsInStock)) {
alert("[재고 수]\n숫자만 입력해주세요");
document.newProduct.unitsInStock.select();
document.newProduct.unitsInStock.focus();
return;
}
// <form name="newProduct" ..
document.newProduct.submit();
}
</script>
</head>
<body>
<!-- include 액션 태그 -->
<jsp:include page="menu.jsp" />
<!-- --------------------상품등록 시작-------------------- -->
<div class="jumbotron">
<!-- container : 이 안에 내용있다 -->
<div class="container">
<h1 class="display-3">상품 등록</h1>
</div>
</div>
<!-- 내용 -->
<div class="container">
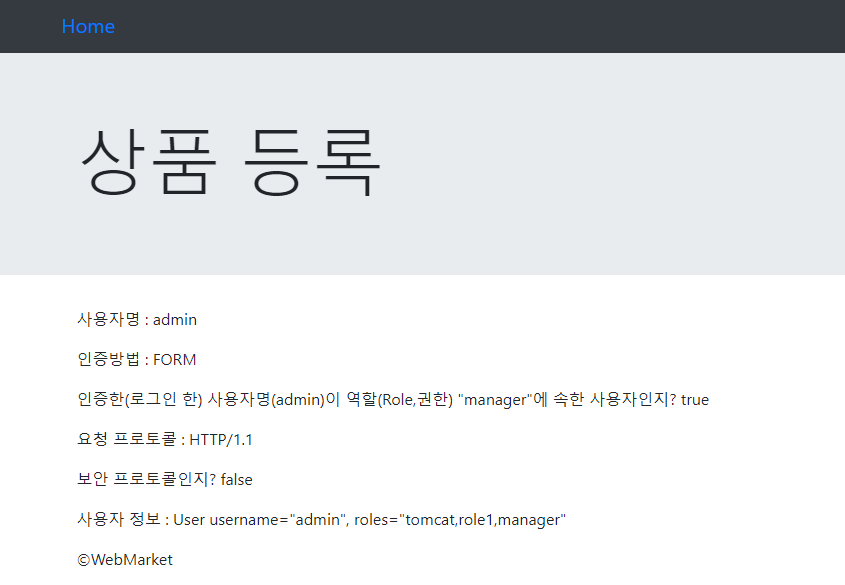
<p>사용자명 : <%=request.getRemoteUser()%></p>
<p>인증방법 : <%=request.getAuthType()%></p>
<p>인증한(로그인 한) 사용자명(admin)이 역할(Role,권한)
"manager"에 속한 사용자인지?
<%=request.isUserInRole("manager")%></p>
<p>요청 프로토콜 : <%=request.getProtocol()%></p>
<p>보안 프로토콜인지? <%=request.isSecure()%></p>
<p>사용자 정보 : <%=request.getUserPrincipal()%></p>
</div>
<jsp:include page="footer.jsp" />
</body>
</html>
로그인 & 로그아웃
- 로그인
menu.jsp
<%@ page language="java" contentType="text/html; charset=UTF-8"%>
<%@ taglib uri="http://java.sun.com/jsp/jstl/core" prefix="c" %>
<%@ taglib uri="http://java.sun.com/jsp/jstl/functions" prefix="fn" %>
<%@ taglib uri="http://java.sun.com/jstl/fmt" prefix="fmt" %>
<% // 스크립틀릿
// 시큐리티의 사용자명을 가져옴
String username = request.getRemoteUser();
// out.print("username : " + username + "<br />");
%>
<!-- JAVA세계의 변수 username의 값을 JSTL세계의 변수 username에 할당 -->
<c:set var="username" value="<%=username%>" />
<nav class="navbar navbar-expand navbar-dark bg-dark">
<div class="container">
<div class="navbar-header" style="width:100%;">
<!-- 요청 URL : /welcome.jsp -->
<div style="float:le28ft;">
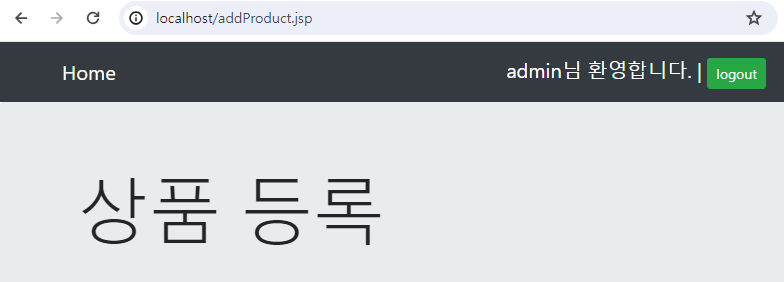
<a class="navbar-brand" href="welcome.jsp">Home</a>
</div>
</div>
<div style="float:right;">
<span class="navbar-brand">
<!-- 로그인 했음 -->
<c:if test="${fn:length(username)>0}">
${username}님 환영합니다. |
<a href="/logout.jsp" class="btn btn-sm btn-success pull-right">logout</a>
</c:if>
<!-- 로그인 안함 -->
<c:if test="${fn:length(username)==0}">
<a href="addProduct.jsp">로그인해주세요.</a>
</c:if>
</span>
</div>
</div>
</nav>
- 로그아웃
logout.jsp
<%@ page language="java" contentType="text/html; charset=UTF-8"%>
<%
	//스크립틀릿
	//FORM 인증 형식을 통해 로그인 처리 시 session에 정보가 들어가 있음
	//session객체 : session scope(영역)에서 생성된 내장 객체.
	//pageContext(page), request(request), session(session), application(application)
	//모든 session을 종료
	//로그인 인증 시 웹 브라우저에 자장된 모든 사용자를 삭제
	session.invalidate(); // 세션 없애기

	//addProduct.jsp를 요청한다는 의미는..
	//<role-name>admin</role-name> 롤을 갖고 있어야 함
	// /login.jsp에서 로그인 다시 하고 와
	response.sendRedirect("/addProduct.jsp");
%>
'스프링' 카테고리의 다른 글
| [스프링] 17장 예외 처리 (0) | 2024.04.16 |
|---|---|
| [스프링] 16.5장 과제 (0) | 2024.04.15 |
| [스프링] 15장 쇼핑몰 시스템4 (0) | 2024.04.12 |
| [스프링] 14장 정규 표현식 (0) | 2024.04.12 |
| [스프링] 13장 유효성 검사 (0) | 2024.04.11 |